Monitoring Printers

Abstract
This document describes how you can monitor a printer. Specifically, HP™ printers that have internal/external JetDirect® cards/devices, or other print servers (like the Troy™ PocketPro 100S® or the Netgear™ PS101®) that support the JetDirect protocol.
The check_hpjd plugin (which is part of the standard Nagios/Shinken plugins distribution) allows you to monitor the status of JetDirect-capable printers which have “SNMP” enabled. The plugin is capable of detecting the following printer states:
- Paper Jam
- Out of Paper
- Printer Offline
- Intervention Required
- Toner Low
- Insufficient Memory
- Open Door
- Output Tray is Full
- and more...
Introduction
These instructions assume that you’ve installed Shinken according to the Installation tutorial. The sample configuration entries below reference objects that are defined in the sample config files (“commands.cfg”, “templates.cfg”, etc.) that are installed if you follow the quickstart.
Overview
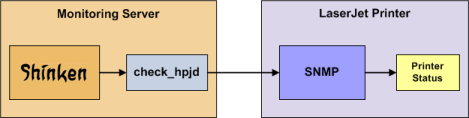
Monitoring the status of a networked printer is pretty simple. JetDirect-enabled printers usually have “SNMP” enabled, which allows Shinken to monitor their status using the check_hpjd plugin.
The check_hpjd plugin will only get compiled and installed if you have the net-snmp and net-snmp-utils packages installed on your system. Make sure the plugin exists in “/var/lib/nagios/” before you continue. If it doesn’t, install net-snmp and net-snmp-utils and recompile/reinstall the Nagios plugins.
Steps
There are some steps you’ll need to follow in order to monitor a new printer machine. They are:
- Create new host definition for monitoring this machine
- Restart the Shinken daemon
What’s Already Done For You
To make your life a bit easier, a few configuration tasks have already been done for you:
- A check_hpjd command definition has been added to the “commands.cfg” file. This allows you to use the check_hpjd plugin to monitor network printers.
- A printer host template (called printer) has already been created in the “templates.cfg” file. This allows you to add new printer host definitions in a simple manner.
The above-mentioned config files can be found in the ///etc/shinken/// directory (or c:shinkenetc under windows). You can modify the definitions in these and other definitions to suit your needs better if you’d like. However, I’d recommend waiting until you’re more familiar with configuring Shinken before doing so. For the time being, just follow the directions outlined below and you’ll be monitoring your printers in no time.
Tip
We are supposing here that the printer machine you want to monitor is named printer-1. Please change the above lines and commands with the real name of your printer of course.
Declare your new printer in Shinken
Now it’s time to define some object definitions in your Shinken configuration files in order to monitor the new Linux machine.
You can add the new host definition in an existing configuration file, but it’s a good idea to have one file by host, it will be easier to manage in the future. So create a file with the name of your server.
Under Linux:
linux:~ # vi /etc/shinken/hosts/printer-1.cfg
Or Windows:
c:\ wordpad c:\shinken\etc\hosts\printer-1.cfg
You need to add a new host definition for the Linux machine that you’re going to monitor. Just copy/paste the above definition Change the “host_name”, and “address” fields to appropriate values for this machine.
define host{
    use             printer
    host_name       printer-1
    address         192.160.0.1
}


* The use printer is the "template" line. It mean that this host will **inherits** properties from the printer template.
* the host_name is the object name of your host. It must be **unique**.
* the address is the network address of your printer. It can be a FQDN or an IP.
What is checked with a printer template?
At this point, you configure your host to be checked with a printer template. What does it means? It means that you got some checks already configured for you:
- printer check each 5 minutes: check with a ping that the printer is UP
Note
TODO: fill what is checked with HPJD
Restarting Shinken
You’re done with modifying the Shinken configuration, so you will need to verify your configuration files and restart Shinken.
If the verification process produces any errors messages, fix your configuration file before continuing. Make sure that you don’t (re)start Shinken until the verification process completes without any errors!